About Me

My photo
Newcastle upon Tyne, Northumberland, United Kingdom
This is a blog I use to share my papercraft projects. I make them for friends and family, as well as selling them to fund my craft stash. You can get in touch with me at loumac03@gmail.com if you have any questions or would like to place a commissioned order.
Showing posts with label Stamping. Show all posts

Monday, 1 June 2015

Coming up Roses

Gooood morning!!

Popping in with a quick post this morning!


I created this card using WPlus9 Coming Up Roses. It's a two step stamping set (say that three times fast!) and it's so, so easy to use.

I stamped the roses using a mixture of Memento ink and Versamagic chalk ink and I'm pretty happy with the colour combos I managed to achieve this time!

I added a stamped sentiment from MFT - More Essential Sentiments and die cut everything using MFT - Blueprints 24

I added a couple lilac brads and smooshed everything together.

Job done. Thank you for stopping by today! :) xx

Monday, 18 May 2015

Feathery Thanks

Good morning you wonderful lot!

I'm quickly popping in to share this card with you all. It's a mash up of a few companies!


I adore these stamps! They're so cute, and they're of such high quality, they stamp beautifully.


Any questions, please just ask. I must dash, it's almost bedtime here! The joy of scheduled posts! xx

Monday, 20 April 2015

Birthday Wishes

Moooorning peoples! :) 

Time for some inspiration for My Mum's Craft Shop.


Apologies for the quality of the photo, I took it on my phone and it's a little grainy.

I used a combo of Altenew and WPlus9.

WPlus9 - Happy Trio Dies

I had a blast stamping these pretty flowers out! I really need to get some new ink colours to try some new combos, but for now, I really love those orange flowers! 

I die cut a happy from the cardstock I had stamped with the flowers and layered it up to create a 3D effect. I then stamped birthday wishes from the coordinating stamp set from WPlus9 to finish up the card. I hope you likey! :) xx

Monday, 6 April 2015

Polly's Pals

Another Monday rolling in! I can't even believe we're in April!! A quarter of the way through the year already. Madness!!

The good news is, I have the week off work. The bad news is, I'll be spending most of my time at the boat. Some of you who know me will know me and the boy have taken a ridiculously large restoration job on and.. quite frankly.. I just wish I would finish itself.

Onwards.

I'm here to share some inspiration with you all using products available at 


 I have used the gorgeous little girlie from The Hobby House toppers set - Polly's Pals.

I created a Christening card with her.


I added the personalised details using a Lawn Fawn alpha stamp set. I went a little OTT with embellishments, adding buttons, crochet flowers, vellum flowers and both half pearls and liquid pearls. Love how it turned out though. The unusual colour combo is taken from the topper itself - I love how it works.

That's all from me for today. Please be sure to stop by the BLOG for daily inspiration. xo

Monday, 23 March 2015

Don't Worry

It's a Clean and Simple kinda Monday here at Cartolinas.

I have a rare Monday off work, so I will be busying myself with colouring in and watching episodes of my fave series. Perhaps throw a couple David Attenborough documentaries in here and there.

Such a shame I have no chocolate to feast on!

Today, I'm popping in with some inspiration using goodies from


Kitty is working round the clock to bring us loads of new goodies, and she is not gonna disappoint!

Today I'm using a bunch of Mama Elephant products and my all time favourite die from MFT Die-namics.


Please be sure to stop by the blog for more daily inspiration! xx

Tuesday, 3 March 2015

Friends like you..

Gooood morning you wonderful lot! 

Some of you may be wondering if I have simply disappeared from the face of the Earth. The simple answer to that, would be no. I just really haven't had the energy or the inclination to type up blog posts lately. I know that's bad of me, but sometimes I feel it's utterly pointless for the hits I get.

Onwards. Today we have a new challenge over at Passion for ProMarkers

This week, our lovely Shelly would like to see..

LOVELY LILAC AND LEMON.

I froze a little with fright when I first seen this challenge listed over in DT land! Lilac and lemon are pastel colours. I never use pastel colours. I go bold or go home. So I really had to get my thinking cap on for this one. I sat down and worked out some new, paler, colour combos, and went to work.


I used this gorgeous image from Stamping Bella, which I have had for ages but never properly coloured up. I love these images. They're not super detailed, so relatively quick to colour up. Plus the style in which they are drawn is very forgiving if you do happen to go over the line or squiggle a little messy. Love them. I must invest in more in the future! 

Anywho. PRIZES!! I know some of you absolutely ROCK these pastel colours, so I can't wait to see what you whip up! ;) Crafty Sentiments are sponsoring us. They're offering a prize of THREE digis to the lucky winner! 

Thank you for stopping by today! I hope you get a chance to join in. xo

I'd like to enter my card into the following challenges:

Monday, 9 February 2015

You are too kind!

Mooonday!!

Good morning wonderful people! 

I've got another make to share with you all today. This time it's an Avery Elle and MFT mash up! 


I layered the stitched panel onto a vellum die cut, cut with Blueprints 20. I can't tear myself away from these dies at the moment! 

Thanks for stopping by today. xo

Monday, 26 January 2015

You're the best!!

Good morning you lovely lot! 

I'm checking in with you this morning with some My Mum's Craft Shop inspiration. Using a bunch of Lawn Fawn goodies - which Kitty will have back in stock ASAP! You don't wanna miss out. Keep your eyes peeled for our newsletter dropping into your inbox. 


I used the THANKS DIE from Lawn Fawn to create my own chipboard word. I die cut the thanks with some navy blue cardstock 4-5 times and layered them up.

I then stamped a sentiment from Thank You Tags before cutting it with a die from Blueprints 20 from MFT and layering it over a tag cut using another Lawn Fawn die.

As a little whimsy, I stamped coloured and die cut a little critter from Monster Mash stamp set and matching die and tucked it behind the tag.

That's about it. Oh, and my papers are old My Minds Eye!

Thank you for stopping by today! xo

Wednesday, 21 January 2015

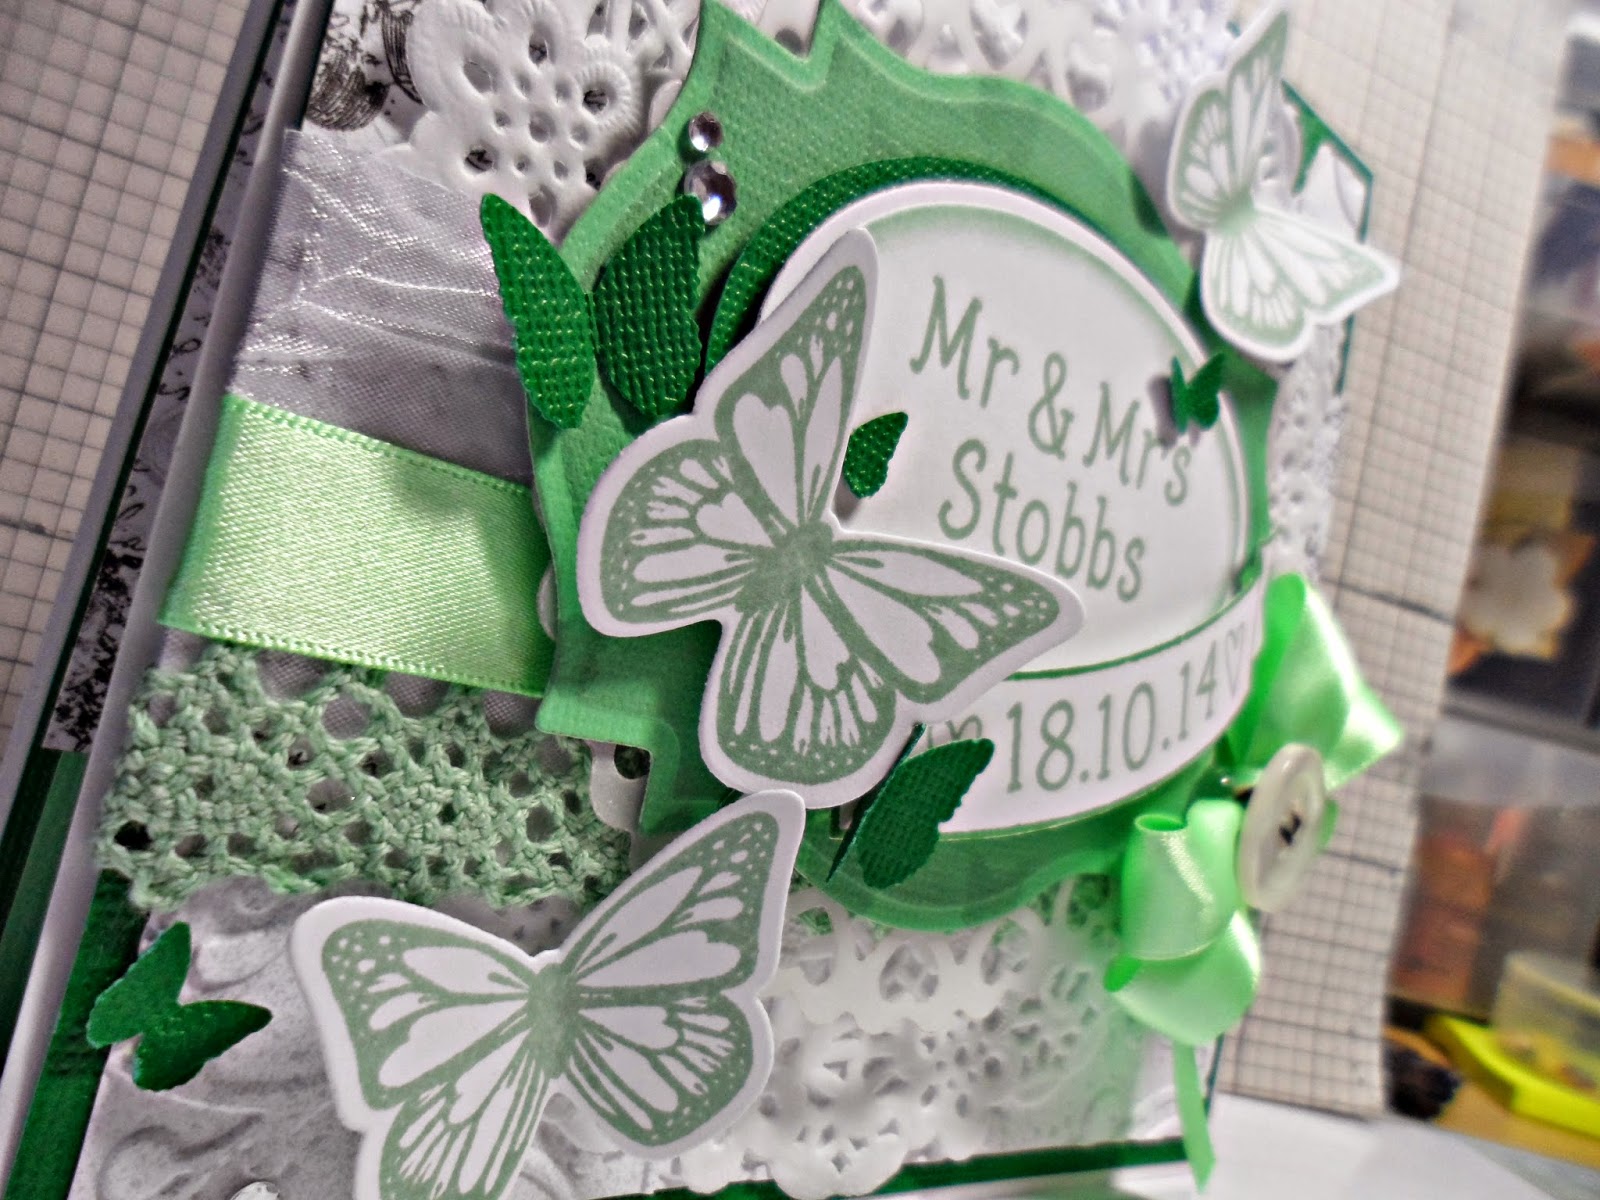
Butterfly Wedding

Yet another card, from way back last year. That I failed to share with you guys. Nightmare.


I tried to match the invite up as closely to the invitation as I could - I thought it'd be a nice touch. 

I love the minty green colour. I think I used up the last of that ribbon on this card - but it was so worth it! :) xx


Tuesday, 20 January 2015

New Beginnings

Good morning you lovely lot! :)

It's time for a new challenge over at Passion for ProMarkers.

This week it's my turn to set the challenge theme, and I wanna see..

NEW BEGINNINGS!!

This could be anything from a new baby, a new home, a new job or perhaps tying the knot.


I have had this set from Some Odd Girl for some time now. The amazing Faye kindly mailed them over to me and had since been sitting in my *to use* pile, patiently waiting.

I adored making this card. Quick, punny and easy to put together. In fact, I'd go as far to say I love this set. Why have I left it hanging around, unloved, for so long?! The perfect wedding card for close friends, I reckon. I know my friends would appreciate something *different* like this.

That's my inspiraton for ya today. I do hope you find time to join in with this challenge.
Head over to Passion for ProMarkers for more inspiration and to leave your link so we can have a snoop around at your entry and your blog! Hugs. xo

Monday, 19 January 2015

The Birthday Fairy

*waves* I can't believe I didn't share this card with you guys waaay back at the beginning of November. I am terrible, I know!!

I made this card for a girl who is a lover of many things. Many things of which I tried to squeeze onto the card without it looking ridiculous.

Fairies, stars, toadstools, butterflies and flowers! Naturally, like most 11 year old girls she's a huge lover of pink, so I went really pink with some hot pink ribbon and flowers. Hopefully by age 24 she'll have grown out of it slightly! ;) It's not one of my favourite, in case you guys didn't already know.


I used the adorable Charlotte from Funky Kits. Grab her while you can as she's retiring soon. I also used some toadstool stamps from Some Odd Girl which I always have a blast colouring up as well as a Martha Stewart butterfly punch.

I used my Cameo to create her name and age before stamping a Paper Smooches banner with Lawn Fawn alpha stamps to create happy birthday and added it all the card.

As finishing touches I chose some flat and 3D paper flowers, some glittery buttons and a whole load of liquid pearls and sequins. Job. Done. xx

Friday, 16 January 2015

Wheat, Dears and Dimension

Good afternoon you wonderful lot. 

Happy Friday!!

I'm popping in to share an anniversary card I created last year. This was a very special request from a lovely regular of mine. She always gives me loads of details to work with and this time it was something along the lines of, wheat stalks, deers and nature. Here's what I came up with.


Yip, that's right. I even used up some of my beloved Petal Lu flowers. I added a bunch of flowers and 'foliage' in the form of die cut leaves. I cut the little deer using my silhouette and stamped some wheat stalks (which admittedly are difficult to see in the photo) onto the kraft background and the vellum piece behind the top oval.


I kept the focus on the sentiment by stamping it in rich black and adding a black matt around the panel, but there are still loads of little details to draw your eye around the piece.

I hope everyone who had something to do with this card really enjoyed it, I know I had a blast making it! :) xx

Thursday, 6 November 2014

Fresh Cut Florals

I shared this card over at the My Mum's Craft Shop blog on Monday, so I thought I'd pop it on my blog too :)

WPLUS9
http://www.wplus9.com

 My Mum's Craft Shop will be stocking products from this fantastic company VERY soon!!

Here's a little project I whipped up to whet your appetite using
and the


I used a bunch of Memento, Versamagic and Stampin Up! inks to create these florals. The fantastic thing about this stamp set is the ability you have to create layers within just one flower. 

http://cdn2.bigcommerce.com/server500/b0f41/products/194/images/1487/
wplus9_freshCutFlorals3__31538.1408672644.1280.1280.png?c=2

A very fun set to sit in front of a film with. Die cut a bunch of the flowers, grab your inks and go to town with the gorgeous stamps!

Thanks for looking. xx

Tuesday, 4 November 2014

Frosty Snowflakes

Snowflakes, snowflakes, snowflakes. I love me some snowflakes. I had to use two older My Favorite Things stamp sets from last year to create these two cards.


I used three colours of ink from Stampin' Up! Rich Razzleberry, Perfect Plum and Bashful Blue. They work so well together. I added a Bashful Blue matt before adhering the card front to the card base using dimensional adhesive. 

As for the sentiment I embossed it in silver onto some vellum and attached it to the card using some silver brads! Super easy card to replicate! 

Thanks for stopping by. xo

Tuesday, 14 October 2014

Congrats, It's a Girl!

Sorry it's been so quiet over here, again. I've been getting my Christmas on LARGE and have made over 30 cards this past week. I'm getting a little bit bored of the green and red (luckily I can throw some blue and purple into the mix) so I took a break on Saturday night to create this card for the new challenge over at Passion for ProMarkers today! 

Oh Baby!!


I used the adorable Pushchair stamp from Lili of the Valley for my card. I bought this cutie a while back, but this is the first chance I've had to get her coloured up. I need my wrists slapped! I stamped the image in Angel Pink ink from Memento. I really think this LOTV images lend themselves well to the no line colouring technique.

I wanted to keep the colouring pretty neutral with only a pop of colour (for girl or boy) on her little hat and baby grow. I wasn't 100% sure of the papers I wanted to use either (which is very unusual for me, I rarely colour an image without matching it to papers first) - although it just turned out that the pink I had chosen matched perfectly with First Edition - Bird Song papers.

That's all from me tonight! Better bury my head back into Christmas before I hit the hay! Thanks for stopping by. xx

Tuesday, 7 October 2014

Mr & Mrs Bennett

I'm popping in today to share my latest wedding card with you all.

I made this for a friend of a friend. I used a cut file from the Cameo store. LOVE the intricacy of this cut! It's only tiny, at about 3.5"x3.5" as it's cut from one strip of 12" paper. 


I cut the design from cream Bazzill cardstock and layered some black textured cardstock onto some gold mirri before tucking it under the intricate design. I then created a black wrap to keep the card shut, and embellished it with some gold ribbon and some gorgeous Petal Lu flowers.


I created a small box to give it in and used more of the gold ribbon from the wrap around to create a little bow to keep the box base and lid together. Job done.

Sunday, 5 October 2014

60th Birthday

Morning guys! I've kinda fell off the blogging wagon of late, oops! I really have no excuse, so.. let's get cracking. This morning I'm gonna share my biggest card yet. This was my first 8"x8" card that I made for a lovely lady at work. 


I created the large 60 using my trusty Cameo then added embellishments around it to suit the recipient. 

This lady always brings the most yummy cakes into work, so this little Me To You Bear with her little pinny and pile of cupcakes was perfect for the card. I added a large doily and some pretty organza ribbon.

I then raided my flower box for a couple small flowers to cluster in a couple areas. I then added some Liquid Pearls and boom, done.

I thought I'd have trouble filling such a large space. All I could think about was.. wow, people make scrapbook pages this size! Hah! Stoopid.

I hope you like what you see. Thanks for stopping by. xo

Tuesday, 30 September 2014

Warmest Winter Wishes

Morning guys! :)

It's time for a new challenge over at Passion for ProMarkers.

This week we wanna see your feminine makes! 

MAKE IT FEMININE

I wanted to go against the grain a little, so I opted out of pink and frilly. Instead I went with blue and texture. I hear ya, I hear ya! ..but I took some inspiration from a gorgeous photo I came across while scouring Pinterest! 

Glamorous Hollywood style tufted headboard against floral and branch wall covering.
http://www.pinterest.com/pin/474918723177846146/

I loved the colours and the texture in this photo. So I used this as my starting point to create this card. I wanted to create a winter card, so I used the gorgeous Super Cute Hat from Time for Tea Designs.

I really wanted to practice my hair, as I feel like I've let it slip after concentrating on folds and creases for so long, so this was the perfect image for that. This took me almost three hours to colour up - good job I wasn't in a race.


I added an embossed panel to a kraft mat before layering a doily and my image on top. I then added a strip of snowflake paper from LOTV and edged it with some loopy trim. I then dug out some die cut vellum snowflakes and attached them by stitching white buttons over the top.

I added my sentiment from Amy R Stamps before looping some white cord around and around and tucking it under the image panel. I adhered it with glue dots and kept fiddling until I like how it looks. I really like how that turned out - I'm glad I've now found a use for all the colours of cord I seem to have sitting in my stash that go unloved! 

To finish the card off I added a sprinkling of Doodlebug sequins here and there to match the doily which I also sprayed silver with my Fireworks (although you can't really tell from the photo, it's super shiny IRL).

That was that! I hope I've inspired you to think a little more outside the box with this challenge. 
Be sure to stop by the Passion for ProMarkers blog to see what other amazing girls have come up with! xo

Wednesday, 24 September 2014

Your future is bright.

Hello guys! Why do weeks off work zoom by at super sonic speed?! Meeehhh!! That phrase.. time flies when you're having fun! It most certainly does.

Today I'm popping in to share some INSPIRATION with you all using products you can pick up at My Mum's Craft Shop

I spotted a card over on.. I wanna say Pinterest, but I'm not totally sure. I wish I had a link to give ya as it was a total inspiration, but.. I don't.


I started off with some Distress Ink in Tumbled Glass and Mustard Seed. I used some watercolour paper and created a little background with the DI and a tonne of water. I masked the edges of the watercolour paper with some washi tape to create a little white border.

I then stamped a sentiment from My Favorite Things - Watts Up? stamp set in Versafine Onyx Black ink. 

I then went to town building up my little lightbulb using the Die-namics Lightbulb die! I created a white base, and added another vellum layer which I used to inlay the little heart design in the centre. Very cute.

Before adhering everything down, as a last finishing touch I took some more Mustard Seed DI and some various circles from My Favorite Things - Bokeh Builder and added them in a diagonal pattern down the watercolour panel.

I adhered everything to an orange matt (I desperately need some rolls of foam adhesive, that watercolour paper refused to lay flat).. and then added it to my card base. Oh, and I chucked some Doodlebug sequins onto the design too.

I really love how this card turned out. It's always good to get out of your comfort zone every now and again! Be sure to to stop by the blog for daily inspiration and the website is regularly updated with new products. xo

Tuesday, 23 September 2014

Christmas Frosting

Good morning you lovely lot! I finished up this little card in the early hours of the morning this morning (a lot of mornings in that sentence), when I couldn't get back to sleep after the boy had left for work!!

It was still dark outside my window and everything felt totally winter-y. Loved it.

I went for a bunch of red and black for this card. I absolutely LOVE Kelly's style, and I think these images lend themselves well to something a little different. 

This is Sugar Frosted. You can buy all of these images from That Craft Place Etsy Shop


I started off with some Echo Park paper from last year and added some white frantage in a diagonal pattern across the red patterned paper. I then cut a strip of the bauble paper and added a scalloped border along with a strip of grosgrain ribbon.

I added a sentiment from Amy R stamps, a couple vellum snowflakes, a bunch of sequins and that was job done.

I always have a blast colouring these cuties up! Grab yours HERE today! xx

Search My Blog

My Fellow Craft-o-Holic Followers

Total Pageviews