About Me

My photo
Newcastle upon Tyne, Northumberland, United Kingdom
This is a blog I use to share my papercraft projects. I make them for friends and family, as well as selling them to fund my craft stash. You can get in touch with me at loumac03@gmail.com if you have any questions or would like to place a commissioned order.

Tuesday 31 December 2013

TFT - New Years Resolutions

I know yesterdays post was gonna be my last, but I just had to squeeze this cutie in.. on New Years Eve too! :) Now I really have fulfilled a post a day. I am pretty proud of myself. 

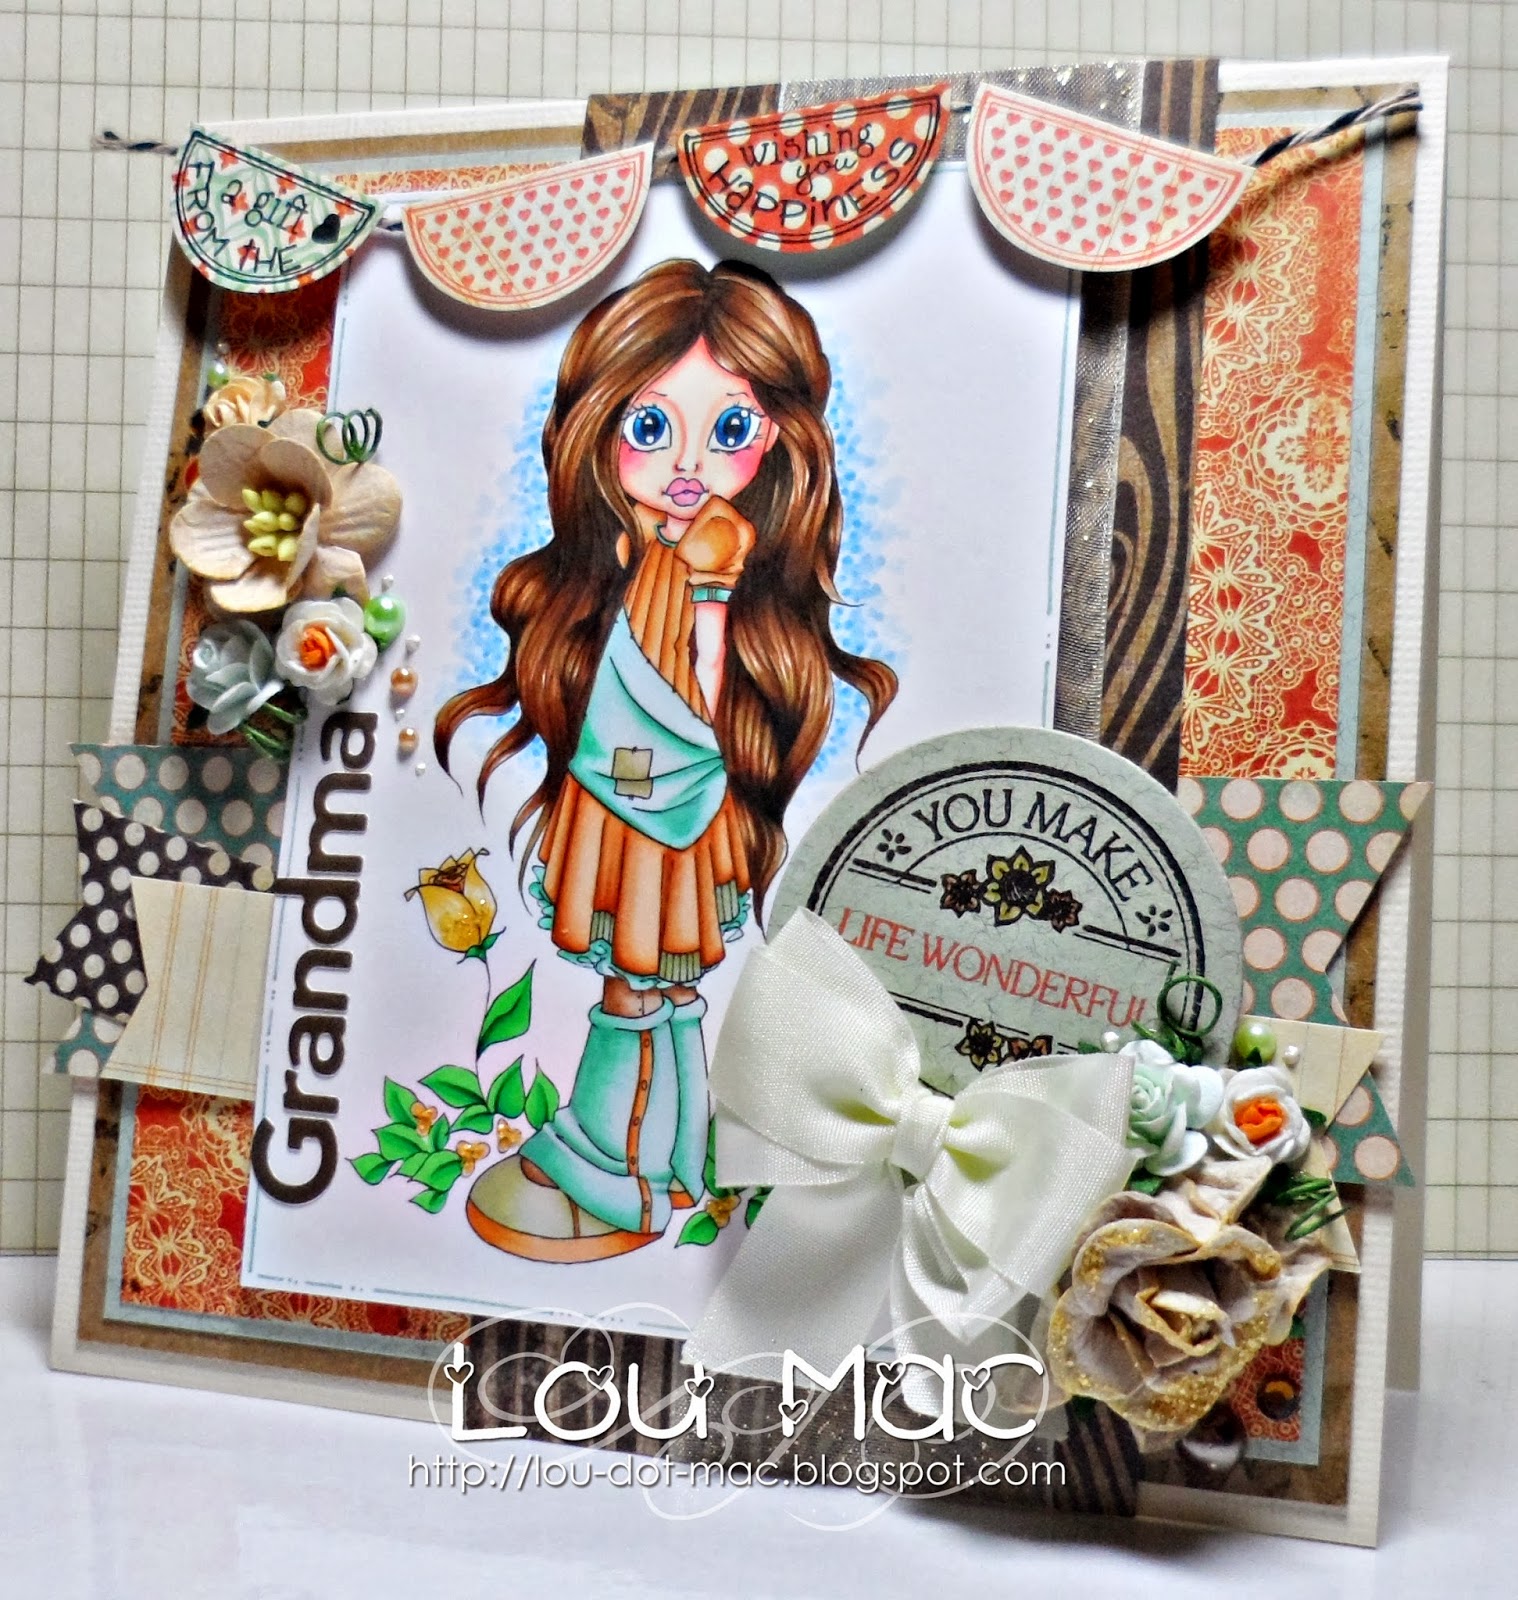
Onwards. This is an image from the November release over at Time for Tea Designs. All of Jo's amazing images can be purchased over at her Etsy Shop

This girlie is aptly named New Years Resolutions. I totally took my inspiration from Jo when colouring up her dress. Jo is an absolute magician when it comes to ProMarker work! She holds regular Demo Days at Hobbycraft in Sheffield - oh how I wish I lived closer!!

I decided to create another easel card so I had room for a 2014 calendar on the base. This card would be good to keep out on a desk or side table to remind yourself of all the promises you made at the beginning of the year, hehe. I kept the colour scheme in blues, yellows and kraft. I used one of my faaavourite My Minds Eye paper packs which I've been holding on to for a ridiculous length of time.


I was watching.. something on Create and Craft the other night and it spurred me into thinking about my Fimo and the few molds I bought waaay back earlier in the year. I only used them a couple times, and then they got thrown in the drawer and forgotten about. Naughty me!! So, off I went to dig the stuff out.

I knew I'd be using a lot of turquoise, with it coming up to Valentines, and taking a look at the papers in my drawer I knew that it'd be a common theme, so I decided to make up a bunch of turquoise bits and pieces. Afterwards I hit eBay and bought a few more molds, mainly buttons. Can't wait to have a play with those. I also treated myself to a pack of Martha Stewart paper clay. Fun times ahead! 


So I used one clay doodad in the little sentiment/ flower cluster on the card, and another underneath the calendar. I dusted my molds with talc, and some of it stuck to the little flower design, so instead of brushing it off I put them in the oven with the hope that it'd bake into it - result! It looks so pretty.

I added a few Whimsy Stamps Tickets to the design as well as some die cut swirls (both in Kraft cardstock from Papermania) some organza ribbon (anyone know the width of that? 23mm? 25mm? - I need some more in my life. See what happens when I promise myself I'll use stuff up?! Hah!!), some Wild Orchid Craft goodness and a little clock charm. 


I was going to go crazy with buttons too, but I thought with the busy patterned paper I used in the background and the larger image panel, I thought I'd let the things I'd choose speak for themselves without adding more for the eye to take it. 

I think I've learned a lot over the last year about embellishments, their placement and having 'empty' spaces on cards for your eyes to rest. Thanks to a lot of YT and blog hopping. 

So with all this in mind I thought I'd set myself 5 Crafty New Years Resolutions
1. Experiment with my colouring.
Don't worry my little ProMarker buddies, I will continue flying the flag for us, and I hope you will too (yes, I'm talking to you Coops and Donna!!) I want to push myself to create backgrounds, groundings, more intricate clothing, more detailed hair, more shading. The whole whack!! 
Pussssssh myself.
2. Leave more love.
I don't think I've done too badly this year. I have burst of blog commenting every few weeks or so. If I haven't stopped by your blog lately and left you love, I can only apologise.. but I will be there! Soon!!
3. Be more organised in my own personal card making.
So, almost everyone who knows me knows I make my own cards now.. and if they don't receive one for their birthday or anniversary.. or Christmas.. I always feel like I've let them down. So from now on I will have a calendar up above my desk a month a head so I can see all of the cards I need to make in the next month to get sent out. 
Fingers crossed all goes well! ;)
4. Keep a better record of inspiration.
Whatever it may be that I find when browsing the web, or checking FB, or blog hopping - I always seem to.. lose. I might be under the impression that it's tucked away somewhere in the depths of my brain, but when I get sat at the craft desk.. *poof* it vanishes, and I might as well not have bothered spending 4.5 hours searching for said inspiration.
Long story short - make better use of my sticky notes and note pad. 
5. Use. It. Up.
I say this every year, but every year I get even better at it.
I've already mention in previous posts that I think I've found my *hotspots* in my craft area, so every couple months or so I plan on rotating some of my stash, like the stuff that I haven't been using very much will get moved into the areas I dip into all the time. That's the plan anyway.

Who's with me?! LOL! Thanks for stopping by today. 

Best wishes for next year, everyone. Let's hope it's the best yet! :)

Monday 30 December 2013

2013 Favourites

.. so I tried to limit myself to 10 cards.. it didn't happen. This post has been a long while in the process, and I know that you may not want to read all of my waffle - if not, just have a flick through some of my projects, and if you do - grab a mug of your favourite liquid and join me.. I'll meet you at the end. 

****************** ************* ************** ***************** 

I realise that as the years go on (this will have been my 3rd Christmas since I started crafting in early December of 2010) - I make more and more cards each year. Whether it be commissions, personal cards, or orders placed by my friends, the number of creations seems to increase each year.

.. and that is no bad thing. It just means this post on the 31st December each year will be that bit longer. Maybe 2014 will see me a little more decisive and choose less for better reasons.

****************** ************* ************** ***************** 

Let's start.

My Favourite Cards of 2013


#1 - I think this is the first example I have of the ambition to create a 'scene' on my card. I teamed up Some Odd Girl - Renew goodness with some PaperCraft Junkie commissioned pieces and her castle! I also love the colours I used on this card - the mustard yellow dress looks lovely with the aqua flags and torrents.  


#2 - This was the last card I made for my Grandma before she passed away in hospital earlier in the year. She left it on her windowsill the entire time she was in there! :) It was a 'feel better' / 'happy Mother's day' card combined. I love this image from Saturated Canary, all of that hair is a treat to colour, and I used up some of my older My Mind's Eye paper - love that woodgrain.

This card now lives on my mirror in the living room as a happy memory. Loved the bones of that woman.


#3 - This was the first time I ever coloured up a Redonkadoodles image, and I loved it. I added a lot of detail to the area of the shoe with some little flower stamps. The Rendonkadoodles designs are so clean and a dream to colour! :) Highly recommend them. I also picked this card as it's so blingy, girly and in your face. Not my style at all, but I really pushed the boat out and gave the lady what she asked, gold glitter tape and all! :)


#4 - I LOVE creating designs like this. The base of them is just clean and graphic, then I go crazy with embellishments and fonts. I used some Bling card from Bazzill as well as a bunch of WOC goodness, Lawn Fawn alpha stamps, Thickers, The Ribbon Girl ribbon, lace and mesh.. aaaaaaaand a whole load of love. Such a clean colour combo and that diamond embossing will never get old! 


#5 - This Some Odd Girl clear stamp Fairy Magic REALLY spoke to me when I received it in the post from the lovely Kristy. I created this card when I was part of the SOG DT - and I just knew I had to colour her up with blue hair! I went C-RAZY with embellishments on this card, I think it took me over two days to lay it all out in a way I was happy. 


#6 - Where to start? Not 100% sure why I picked this as a favourite - all I know it.. I LOVED making it. I think this may well be one of the first times, if not thee first time I used a huge flower on a card. I'm not certain on the type of flower that large white one is, but it's definitely from WOC and I love it!! This Saturated Canary image is a treat - I LOVE her big hair and that gorgeous bow. The papers from Teresa Collins are too pretty - I gotta use them more next year - if I haven't sickened myself with reds after Christmas.


#7 - This was possibly the first time I posted a card on my blog with a background I had attempted with my ProMarkers. I used to use a sponge and stencil to create a clouded background, but I made a promise to myself to push my colouring a little further this year, and with this, I think I succeeded. It's a given that those clouds are looking a little - flat - it can't be helped. I was doing what I could with the experience given. None. Hah!! 


#8 - Another first on my blog.. I think this card was the first I posted where I showed my attempt at no lines colouring. This card was for my friends little girl who turned 1 earlier in the year. I love the princesses from TGF for little girls cards. :) I used papers from My Minds Eye (love) and I die cut my very own doily using an Xcut die. 


#9 - The layout of this card made me wanna die. If I didn't make OOAK cards, I think I'd just go along with this one every single time. Same die cuts, same flowers, same postage edges - everything. Given, it took me a fair few hours to lay it out how I liked, but I loved it. This card was so well received that the girl who ordered it from me asked for another similar design using different colours for another friend.


#10 - Decoupage? We'll go with that. Said I'd never really be into it. I'm into it!! This was a birthday card for one of my friends and she really loved it. I think designs like this are super impressive. I do love that little squirrel, too. 


#11 - This was another attempt at no lines colouring using an older Sugar Nellie stamp. I created this card for my nieces 18th birthday. I also created my own background with some hills and a beautiful sunset which can just be seen behind the heaps of embellishments.


#12 - Another background, this one was influenced by my boyfriend. He suggested some mountains in the background, so I ran with it. Really love how it turned out - it suits this little dragon from Tiddly Inks perfectly!! I also thought I'd best throw in a male card too. It's not that I don't enjoy making them, I really do like making male cards - it's just that the opportunity never really calls all that much!!


#13 - I've really fallen back in love with Tiddly Inks over the past few weeks - this card is no exception. I crammed so much into this card, yet made sure the image still spoke volumes. I adapted my clouded background a little to include a little more white into the design. I simply outlined the shape of my clouds with my colours for sky - simples. Ahhh, lovely, girly, detailed card.

****************** ************* ************** ***************** 

I hope I've provided sufficient links where I thought links were necessary, if there is anything you have questions about feel free to email me at loumac03@gmail.com and I'll be happy to help you out. I realise that this post has gone on for an eternity, so I'ma wrap it up around about NOW..

I gotta be honest, I only have a few observations from this year:
-My fear of 6x6" cards has been eradicated. Hallelujah. 
- I'm not as scared of pink as I used to be.
- Embellishment overload? ..and what? I do love my buttons and ribbons and liquid pearls especially.
- Matting and layering is my thing - I never thought it would be.
- I feel myself (eventually) gradually moving away from faux stitching.

****************** ************* ************** ***************** 

Hopefully.. I will continue to learn and grow throughout the next year. None of those things listed above are necessarily bad things, and I will continue to create in a way which makes me happy - above all else. Of course, that's what we craft for in the first place, right?

Thank you for sticking with me to the end. If you have any New Years celebrations planned this year - ENJOY!! .. and I'll see you all in 2014! xo

Sunday 29 December 2013

Roaring Fire and Marshmallows.

This is such a lovely, warming, scene that I just had to share it with you all before the year was out.

These past few months have been the first time in my card making adventure that I've tried any kind of decoupage, and I must admit I have really enjoyed it. It has taken me time to find decoupage designs that I actually like the look of, and now that I have I think I could branch out into all sorts of things. Including decoupaging my stamped images.


Sitting by the roaring, open fire. With your faithful pooch and a bunch of marshmallows with the Christmas tree as your backdrop. Heaven.

I hope you've had a wonderfully festive Christmas time. 

Merriment to all. xo

Saturday 28 December 2013

Indigoblu Merry Christmas

I created this card a long while back, way back in November (I'm saying that like it was months ago!! LOL!!) with my first ever Indigoblu stamp

I used a Versamagic ink pad and stamped onto some Naturals Ivory cardstock from SU! I applied a lot of pressure on the stamp, but I just don't think I inked it up enough and ended up with a bit of a blotchy banner.

Never fear! It adds to the 'handmade-ness'! LOL!!


I added a slice of paper from an older Basic Grey pack, and some new American Crafts Christmas ribbon which I bought from TKMaxx a few weeks ago and the job was a goodun.

I hope to create a few of these more simple cards for next Christmas. I wanna be able to send cards out to most of the people I know, instead of limiting myself to only making special ones for those closest to me.

Take it easy. xo

Friday 27 December 2013

Joy Wreath

This was a combination of three main things.

Die-namics Winter Wreath
Amy R - Big Christmas Wishes
and Paper Smooches Relections and matching dies.


A super simple card to put together, it'd be easy to get a production line of these going.
Very Cuttlebug intensive. 

Thank you for stopping by today. Not many more Christmas cards left to show you over the next few days, I bet you're glad to hear! ;)

xo

Thursday 26 December 2013

Feeding the Robins

Happy Boxing Day, guys! 

If you've taken time out of your day to stop by here, thank you ever so much! :) 

Just a quick little post from me today to share another commissioned card with you.

Nanna and Grampy. Feeding Robins.
How cute?! 
Very!!


This is an older LOTV stamp which I've coloured up using my ProMarkers to match older papers from Basic Grey. I added a couple of Whimsy Stamps tickets, some die cut vellum snowflakes and some olive green rhinestones.

A super sweet card, perfect for Christmas.

Enjoy the rest of your Christmas festivities! xo

Wednesday 25 December 2013

Merry Christmas Day!!

Ho! Ho! Ho!

Has the big man in red been and left lots of presents under the tree for ya? I sure hope so!!
I'd like to wish all of my blog followers and their families a day full of magic and wonderment. Have a fantastic day and enjoy the company of those around you.

A JOLLY BIG MERRY CHRISTMAS TO YOU AND YOURS AND I'D LIKE TO WISH YOU ALL THE VERY BEST FOR 2014!!

I'm dedicated, if nothing else, to seeing this 'post a day' through the month of December. I'm back today with my post for My Mum's Craft Shop.

I've used Die-namics Winter Wreath.. again.. can't get enough of it.
This time I've blinged it up with a few little red hearts, gold stars and some mistletoe
from Paper Smooches Freezy Fellas stamp set to jazz it up.


I've taken a sheet of the black patterned paper from Echo Park 'tis the Season and embossed it using a script folder before matting it onto some silver mirri card. 

As for the sentiment I've used an Amy R sentiment stamp and some Lawn Fawn alphabet stamps. 

Finishing touches include some red Liquid Pearls and some gold Stickles. Perfect for Christmas.

xo .MERRY CHRISTMAS 2014. xo

Sunday 22 December 2013

Peeking for Santa

.. so not tonight.. or the night after BUT the NIGHT AFTER THAT the whole world will be reenacting this little scene - except people don't have fluffy faces (a shame really, we might look a little cuter) - as we will all be on the lookout for Santa speeding across the skyline being pulled along in his sleigh by his trusty reindeer.

Ahhh, I can just picture it. It's a shame I'm 23 and the magic of Christmas has worn off a little for me! LOL!

This is an adorable image from DigiStamp Boutique - Bobbi Snow Day.

I knew as soon as I spotted him I had to have him for a friends Christmas card! I think I printed him out and had him coloured up the very same night - although it did take me a little longer to get him onto a card! ;)


I tried to add a little texture to his fluffy face with my blender pen, I kinda like how it turned out for a first attempt. 

I had totally forgotten about my Whimsy Stamps Christmas Tickets at the beginning of December when I properly started making my Christmas cards, so now I'm trying to fit a couple onto every card! LOL! I love them. I've added a big red organza bow, some little black buttons to bring out the dark window frame, a vellum snow flake and a podge of gold Stickles here and there for some Christmas sparkle!! So pretty.

This card would be perfect for a male or female, me thinks. Lovely, bright yet traditional colours. It was for a very lovely crafty friend of mine! <3 p="">

I'd love to enter this card into the DigiStamp Boutique Monthly Competition for December.
As well as:
- A Creative Romance - Sparkle at Christmas
- Crafty Hands - Winter Theme
- Digi Haven - Red and Green

Thanks for stopping by today. Enjoy your Sunday. xo

Saturday 21 December 2013

Vintage Christmas Wreath

What a wonderful lazy Saturday I'm having. :) I thought I'd type this post up 'live' as it were - as I knew I'd be chilling out at home today. What does your Saturday have in store?

*********************************************************

I've been watching Create and Craft all morning (on mute, because some of the presenters and guests voices really grate on me..) and updating my Cartolinas FB page with pictures, price lists and general chit chat.

Now it's my blogs turn to have a few more scheduled posts sorted.

Later on today I plan on making what I *think* will be my last card of 2013 and then I am blitzing my craft room in preparation for the arrival of 2014 and everything the year will bring me, craft-wise.

Over the past 6 months or so, I think I've become a lot more organised when it comes to storing my crafty stash. The things that I have organised well, and things that are kept within easy reach are the items I find myself using time and time again. Now that I have the *hot spots* as it were, in my room sussed - places I can easily get to and reach from the comfort of my chair - I will hopefully (with all good intentions) rotate my stash every now and again, to make sure I keep my designs fresh, and use up everything I own, instead of hoarding some things and using others over and over again.

I mean I know we all wish for a bigger space, but I like to think of it this way.. the less space I have (and let's face it, my space is tiny..) the less chance I have of buying things just because I like them. I buy things because I know they're gonna have to get used otherwise they're gonna take up room which I can't really spare on useless things.

I'm really looking forward to a crafty 2014!

*********************************************************

Aside from my waffle, I thought I'd share another Christmas card with you. :) 

This has been made using the Die-namics Winter Wreath. I cut it from dark green cardstock and some lighter green patterned paper from a waaay old Basic Grey stack (I'm trying my best to use up my little bits and pieces) before layering them altogether. 

I then added some die cut vellum snowflakes, punched some tiny hearts from Bazzill Bling cardstock and added a bunch of red Liquid Pearls all over to give the illusion of little holly berries.


A pretty simple card, all in all, but the wreath takes a bit of time to layer together and arrange. Worth it though, I think it's soo pretty.

*********************************************************

That's all I've got for ya today. I'm off to schedule some more posts and then I will take myself off to the craft desk and begin creating.

Happy Saturday. xo

Friday 20 December 2013

To You All..

Good morning! TGIF!

The eve of the last weekend before Christmas - I KNOW!!

Here's another commission I thought I'd pop in and share with you. 


A quick post today. 

This is an older set from LOTV, which I've coloured using my ProMarkers.

I've added a custom sentiment - which was the whole point of the card - and I've gold embossed it! 

A couple of die cut vellum snowflakes, a polka dot button, a red rose, a holly charm and some doodles. 

DONE!!

Thank you for calling in! xo

Thursday 19 December 2013

Two Little Penguins

Can I get an *awwwwhhh* please?! LOL!!

These two little penguins make my heart MELT!!

I'm pretty new to DigiStamp Boutique, apart from the odd image I've coloured up when they've been kind enough to sponsor us over at Passion for ProMarkers, but I spied the little set of penguins on a blog waaay back in November (I say waaay back because it seems like a while ago now..) (and sorry I can't give any credit to the blog I found them on!! *sad face*) and I just knew I had to have them!! 


Are they not the cutest! They totally are! I've coloured the couple up using my ProMarkers to match papers from Echo Park and die cut the image using a Labels 18 SP die and doodled around the edges.

I added some Viva Decor Pearl pen to the snowflakes on the image, some gingham ribbon and a little marble-y looking button threaded with twine to finish the design off.

Super cute. 

I'd love to enter this card into these challenges:
- Kraftyhands - Anything Goes

Thank you so much for stopping by. xo

Wednesday 18 December 2013

Gift Bags and Boxes MMCS

One week today 'til the big day!! I don't know about you, but I can't quite believe it!! 

This year feels like it has flown by in just a second. I catch myself remembering things that have happened, and then I'm lost in thoughts about the month in which it even happened! It's all become a big blur. Judging by that, I think if I blink a few too many times - this year will be out before I know it! 

Let's make the most of it!!

This week over at My Mum's Craft Shop the DT girls are showcasing a whole bunch of ways to make gift bags and boxes. This theme has come a little late for me, literally all of my friends birthdays are in November, and I have all but two of my Christmas presents already wrapped.. so I had to get my thinking cap on this week!!

Then it hit me - why not make some little favours for the table on Christmas Day?! BINGO!! 

So off I went with my little Die-namics Scalloped Treat Box

I cut out 6 panels from some Kraft cardstock and used my MFT Snowflake Splendor stamp set to decorate the cardstock before assembling my boxes.


I punched a hole in either side to thread a little slice of red saddlestitch grosgrain for an extra festive touch.


As for the name tags, I used a Lawn Fawn alpha set (which we all need to sweet talk Kitty into getting..),
as well as a doily from Die-namics Mini Doily die set,
aaaaaaaaaaand a die from the Snowflake Splendor set
All layered up. 

Once you get a little production line going, you could get through a bunch of these in a relatively short space of time! I recommend you to give it a go. 

If you don't fancy sitting and die cutting a load of cardstock, there are ready made boxes for ya so it's even quicker and easier to get a bunch made:

You can have so much fun!! Thank you for stopping by today! xo

Tuesday 17 December 2013

Girly, Whirly Birthday

It's a week til Christmas Eve!!

ONE WEEK!!

Judging by the speed this year has gone, this next week will go by like.. *zOoOoooooom!!*

Another non Christmas-y creation to share with you all this morning. 

This was part of a commission for my boss at work. 

Knowing this was for a little girl, I went all out with embellishments. I think I have finally conquered my fear of using pink on my creations. Infact, I think I now quite like it! Hah! Who'd have thought?!


I've coloured her up with ProMarkers to match my papers from My Minds Eye Kate and Co. Cambridge Court. I tried out some pleats and a new yellow colour combo on her little party dress. I tried to go with an ombre layered cake too, pretty happy with how it turned out.

If you remember, a few weeks ago I said that I'd be trying to making more of an effort with my backgrounds on coloured images, to take my crafting that little bit further and to make my cards look even more finished. I gotta say, it's going okay. :)

I added some simple cloud outlines and coloured the tops of them with my faded blue. I then added a heap of grass around her feet. 


As for embellishments, hah.. where to begin? 

A big organza ribbon (from The Ribbon Girl) with a little American Crafts ribbon adhered over the knot.
Some Wild Orchid Crafts 10mm roses, a MFT circle doily, a kraft doily (which is almost completely covered, but you can see a little bit poking out on the right hand side of the image), a little crochet trim (again, from The Ribbon Girl), an embossed vellum fence die cut aaaaaaaaaaaaaand of course, some liquid pearls. So pretty.

I really need to start entering my cards into some challenges, I'm getting pretty useless at this. Perhaps I can make that another new years resolution?! LOL!!

Thanks so much for stopping by today! :) xo

Sunday 15 December 2013

Husbands Christmas

I had a couple orders over Christmas for cards for husbands.

I had to use this lovey-dovey image from Lili of the Valley.

I used traditional colours on both cards, but switched it up a little each time. You know me, I can't want won't make the same card twice. 

***********************************************

I used Echo Park 'tis the Season on this card. I matted it onto some red cardstock.
I added a postage stamp edge around my image panel.
The sentiment was created using Lawn Fawn alpha stamps, and I die cut it using an oval die.
I added a die cut Christmas tree, a snow flake charm, and some green grosgrain ribbon.


 ***********************************************

For this card I used a paper pack from My Minds Eye Lost and Found Christmas, which has a slightly more vintage feel. Love that burgundy damask.

I added a scalloped edge to the circle image panel.

As for embellishments, there are some die cut vellum snowflakes, a little gingerbread man button from Doodlebug (LOVE) some khaki buttons, and some gold Liquid Pearls.


 ***********************************************

I coloured both images using my ProMarkers. I added Viva Decor Pearl to the snowflakes on the stamped image. I definitely see me using this image again for a few cards next year, and I think I'll be adding a night time sky to a few of them - it may make it feel even more lovey-dovey! Heh.

Thanks for stopping by.

Enjoy the rest of your Sunday. xo

Saturday 14 December 2013

Wild Birthday

It's Saturday, again. Already.

How many sleeps now?! Like.. 10?! 

Seeeerious.

As another little break from the Christmas-ness that has taken my blog by storm these past couple weeks, I thought I'd share a birthday card I created for a little boy who celebrated his 3rd birthday earlier on in the month.

This is the adorable dragon from the Hello Pet set from Tiddly Inks.

Couldn't you just eat him?!


I gotta give full credit to my boyfriend for the two tone wings and horns we've got going on here. He always comes up with fantastic suggestions, as he sees things totally differently from me. I should hire him! LOL!!

I've coloured this cutie up using ProMarkers and FlexMarkers and I pushed the boat out on the background too.. and added some mountains - also the boyfriends idea. I wanted to include a little sun, but he put his foot down. *Next time ;) when he's not watching me colour*

I kept the rest of the card pretty simple. I used some older papers from an Authentique pack, some thickers and Jillibean alpha stickers, a Some Odd Girl sentiment, a SU! brad and a sprinkling of Gold and Peacock Liquid Pearls.

Thanks for stopping by today! :) xo

Friday 13 December 2013

Happy Birthday Boss Lady

Evening guys!! Thank you for stopping by tonight.
I'ma make this a reaaaaaal quick one, as I'm a sleepy little sausage tonight.

It was my bosses birthday today, and because I know she truly appreciates and loves the cards I make, I thought I'd create something a little extra special for her.


My boss is always in her black UGG boots and I remember her telling me that she wanted a way to wear a hat in the colder weather without spending the rest of the day with hat hair.. (to which my answer was.. pretty much impossible) - so when I seen this image, I knew it'd be perfect for her birthday cad.

I coloured the image up using my ProMarkers - to which I am becoming more and more attached to with each passing day. I see many people heading over to the dark side (Copics) and I'm afraid they will never return!! Never fear, I will continue to fly the flag for the under dogs!! 

I used papers from an older Echo Park pack which I had been struggling to use, I wasn't really feeling the colours or patterns, but this time when I got it out - everything just seemed to fall together. 

Just a little FYI - you may be seeing more swirly kraft die cuts arranged underneath flowers and it's you, Donna Mosley, I have you to thank for that *hearts* - LOVE that woman's work!! I always spend waaaay longer than I actually have time for just staring at her work. I know I don't always leave a comment, but I hope she knows I appreciate what she does. :)

I think I'll wrap this up here and head back over to my bottle fo Jacques before bed time. I cannot wait for a decent enough hour to face plant that pillow of mine.

Peace. xo

Thursday 12 December 2013

Little Bruno

As a little break from Christmas, I thought I'd share a new baby card with you all.

It turns out, I thought I had posted this on my blog waaaay back. Like. Waaay back when I had made it. 

Apparently not.

I really gotta get my photos more organised, so I actually know which ones I have shared with the world, and which ones I can post on my blog to fill in those blank days!


I used a pre-made Boofle topper which was perfect for a little boy. I used my Lawn Fawn alpha stamps to create a custom date and name plaque and bosh. Jobs a good'un.

It really doesn't take long to put together a cute little keepsake like this to give to someone for a special occasion. I do hope the recipients enjoyed this card, and will keep it treasured for years to come.

As crafters, we all know how much thought, time and materials go into each creation - and I always hope that our cards are set aside from the rest and saved from the bin. Even if they're kept in a keepsake box, or tucked away in a drawer. Each time that person catches a glimpse of our creations when rooting through their stuff, fond memories will flood back. :)

Although, let's not get soft. I, myself, know a fair few people who would happily have my card on their mantle piece for the time being, and then think nothing of it after the occasion is over. Hah. It's pretty upsetting, but at least I know and I can save myself from any extra effort.

Anywho, I'll stop the jibber jabber and let you get on with your day.

Thank you for stopping by. 

..and because I couldn't have a post in December without ANY Christmas-y action..

12 SLEEPS! xo

Wednesday 11 December 2013

Cheerful Thoughts

Good morning guys, thanks for stopping by today.

How are you liking my daily posts so far? I've gotta admit, I've had a blast keeping my blog up to date with you all. To be honest, as long as I have my projects made in advance, I can spend a couple hours a few times a week just making sure I have every day covered with a different and decent post. This kinda thing was gonna be one of my new years resolutions - but it appears that I've already reached that goal. May I keep it up!!

So, with it being Wednesday once again, I get to share some My Mum's Craft Shop inspiration with you all!! Ready?

I don't know about you, but I'm getting a little bored of seeing Christmas cards lately, all the red and green is making me feel a little bored - so here's a bright, fun tag using spring colours to bring a smile to your face!!


A super quick and simple tag - created as a little pick me up for a friend.

Here are the ingredients:

I hope you like! :) 

Be sure to stop by the My Mum's Craft Shop for daily inspiration! 

Happy Hump Day. xo

Tuesday 10 December 2013

Mega Christmas Challenge

I'm so pleased you could stop by tonight, apologies for such a late post - I wanted to make sure I had all the right kinda info included before I made it live. I was going to do it last night, but I was out with friends and didn't get in til late and I just wanted my bed. Drinkies on a school night, aren't I just the worst? LOL!!

Waffling aside, I'll get down to business.

This week, over at Passion for ProMarkers, we're launching our very special Mega Christmas Challenge which will run for a whole month - ending on January 7th 2014.

Our theme for the Mega Christmas Challenge is a nice easy one..

INCLUDE A SENTIMENT

Of course, you are welcome to create a Christmas card - but as the challenge will still be running after the ‘BIG’ day you can of course make any type of creation as long as it includes a sentiment of some kind.

As time is precious for our DT at this time of year we are limiting the number of entries you can make to just 3 for this month long challenge.  Please remember to be eligible for our prizes you must use your promarkers, flex markers, tria markers, metallic or aqua markers.

So now for the exciting bit – the prizes!

Letraset are generously offering one lucky a winner a pack of their Autumn/Winter promarkers Ltd Edition set!
Letraset Logo

DigiStamp Boutique are generously offering one lucky winner a prize of a £10 voucher to spend in her store.
DigiStamp Boutique logo

Bugaboo stamps are generously offering one lucky winner a prize of 10 digis of their choice.
bugaboo badge

Polkadoodles is offering one lucky winner a prize of a copy of their Bonbon Belles Double CD collection.
polka doodles logo

Clearly Besotted Stamps is offering one lucky winner 1 stamp set of their choice.
clearly besotted stamps

Dies to Die For are offering one lucky winner a £10 voucher to spend in their online store.
Dies to Die For logo

Bearly Mine Designs are offering one lucky winner a £10 voucher to spend in their online store.
BMD Shop Badge

So to re-cap the challenge will run until 7th January 2014 and you can enter a maximum of 3 times

Unfortunately during the Mega Christmas challenge we will not be choosing a top 5 passionista but this will re-commence for the first challenge in 2014.

We can’t wait to see your creations and look forward to visiting your blogs. I'll be back on the 24th to share my card for your second dose of inspiration! Be sure to stop by the Passion for ProMarkers blog and see what delights Team 2 have whipped up to inspire you to add a senrtiment!

xo 

Sunday 8 December 2013

Lazy Sunday

Lazy Sunday.

Lazy post.


We all love an angel, right?

I LOVE Elisabeth Bell images, but the last few times I coloured some up (given, that was over a year ago) I absolutely hated the results!! Hmmph. So what better way than to create some cards with ready made toppers? I buy mine from My Mum's Crafts Shop.

Perhaps I need to dig out a couple Elisabeth Bell stamps I know I have jammed at the bottom of a drawer and give them another go. A project for a rainy day, me thinks.

Thanks for stopping by. xo

Search My Blog

My Fellow Craft-o-Holic Followers

Total Pageviews